Fixing the Razer Blade Pro (2016, may apply to 2017 as well).
If you're going to drop $4000 (or more) on a gaming machine, it's safe to make a few assumptions about about your expectations. First, you might expect your new machine to look the part. The Blade Pro (and the entire Blade line, really) looks like a device that's worth it's price tag. From the black anodized, all aluminum construction to the glass-clad touchscreen with 100% coverage of the AdobeRGB color space, there's little that can match the massive 17.3" Pro in build quality. And this is before taking into account it's other unique physical attributes, such as the thin mechanical RGB backlit keyboard, massive touchpad, and almost ridiculous 99wh battery. Physically, the Razer Blade Pro certainly doesn't disappoint.2018-09-22 by vertigo
◄What about the performance, though? Well, both the 2016 and 2017 models equipped with Nvidia's GeForce GTX 1080 (not the TDP-down Max-Q edition, mind you) perform similarly, with the largest distinction being their sixth and seventh generation Core i7 CPUs, respectively. On paper, the 2017 Blade's i7-7820HK should greatly outperform the predecessor’s i7-6700HQ. This CPU is unlocked, allowing to to be overclocked, and it's base and boost clocks are both a bit higher. Not to mention the newer architecture revision. There seems to be an issue, however. This is where the Blade Pro's largest fault begins to show itself.nnIn both generations of the Blade Pro, the system's overall performance is thermally and electrically limited. The surprisingly thin 0.88" chassis and two cooling fans are no match for the machine's beastly internals, leaving much of their performance potential untapped. This is particularly true with the unlocked 7820HK, which will thermal throttle before ever reaching whatever egregious clock-speed you may want set it to. But this is far from the worst issue.
The main point of the article is to highlight a flaw (and a fix) that every potential Blade Pro owner should know: The included 250 watt power supply, or some internal component of the machine's power delivery system, is sometimes incapable of providing enough juice for the system to ACTUALLY RUN GAMES. At least, not games that can take full advantage of the machine's horsepower. Here's the lowdown: A large number of Razer Blade Pro 2016 and 2017 owners experience a recurring issue where the device will completely power itself down, seemingly at random, within a few minutes of playing a demanding game. It's not a thermal issue, because the temperatures of all measurable components seem to stay within spec. It's not a hardware fault, because running a barrage of stress tests and benchmarks does not reproduce the issue. The problem seems to occur when the laptop is under full load, like when playing Playerunknown's Battlegrounds at 4K. If there's a sudden spike in demand, such as a number of other players loading in and appearing on the screen at once, the GPU and/or CPU will briefly draw more power than their respective TDP limits before adjusting their clock speeds accordingly. But this brief spike is all it takes. Once the system's total power limit is exceeded, it will immediately power down. Hard. No warnings, no stuttering, just plain off.
Obviously this is a bit of an issue. Your $4000+ dollar machine, with top tier specs, advertised as a gaming machine, actually can't play games reliably - or at all, if you've been afflicted with a particularly troublesome occurrence of this problem. If you search "Razer Blade Pro" shutdown, you'll find many people with this issue. Most of them are upset. Some have learned to live with it. Others have received multiple replacement machines from Razer, just to have the same problem over and over again. So what's the fix?
Most owners have combated the issue by undervolting the CPU and, if necessary, down-clocking the GPU with tools like Intel Extreme Tuning Utility and MSI Afterburner. This makes sense. If the machine is hitting a power wall, and you're able to reduce consumption by just enough, you can avoid the wall entirely. Unfortunately, both these solutions require use of a software utility that launches whenever you boot into Windows. If you format your installation, you have to do all the tweaking over again. If the laptop crashes for another unrelated reason, Intel XTU resets all your settings back to default and your fix is undone yet again. If you want to sell your Razer Blade Pro a year or two down the line, you have to explain to the new owner that they have to do all this crap to make the system stable. Personally, I didn't want to deal with this.
On a custom built desktop computer, you typically have complete control over the configuration of the processor (particularly if it's an unlocked model and an upper end board). Undervolting the CPU is common practice by people who enjoy squeezing the maximum amount of performance out of their machines by optimizing the power consumption and heat output, which allows the processor to run faster while maintaining lower temperatures. On most laptops these settings are unavailable to the end user - but they don't have to be. Particularly if you're a bit of a risk taker.
(NOTE - IF YOU FOLLOW THESE STEPS AND YOUR STUPIDLY EXPENSIVE LAPTOP IS DAMAGED OR BRICKED IN THE PROCESS, I HOLD NO LIABILITY. TRY AT YOUR OWN RISK)
The first step is to install an extraction utility, such as 7zip, which will allow you to unzip the contents of an installer package. You'll need this to get access to the command-line based BIOS update tool that's used by the Razer BIOS update utility, which itself can be obtained from Razer's website. As of the time of writing, the “Meltdown and Spectre Vulnerabilities Updater - Razer BIOS customer updater†is the latest update the includes the necessary tool for the Blade Pro 2016.
Once you’ve downloaded this file, right-click, hover over the 7zip submenu, then select “Extract To…â€. The contexts of the package will be dumped into a folder that shares the same name as the installer file.
Open command prompt in administrator mode and navigate to the directory you extracted the installer files to. From here, we’ll make a copy of your existing BIOS image to modify (and for backup purposes). To do this, run “AFUWINx64.exe bios_backup.bin /Oâ€. This will create a backup in the folder we’re working in. Now, run it a second time, this time with the command “bios_modified.bin /Oâ€. This creates a second identical image for us to modify.
Now we need to get ahold of the AMIBCP utility, which we can use to modify the BIOS image. It’s a surprisingly difficult tool to find, but fortunately I’ve got a copy you can download here. Open the program, then open bios_modified.bin. You’ll need to change the “Files of type†parameter to “All filesâ€.
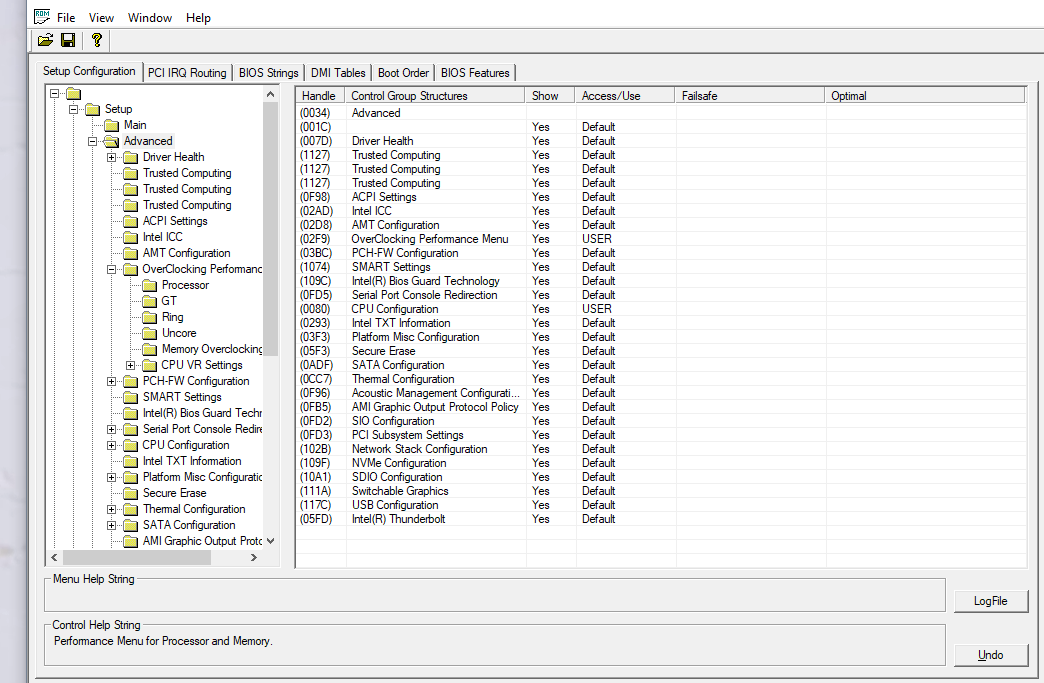
You should now be looking at the directory tree of you BIOS. Expand the first folder, then click on “Advancedâ€. On right right hand pane, find the “CPU Configuration†and “OverClocking Performance Menu†Control Group Structures and set their Access/Use parameters to USER from Default. To be on the safe side, do the same for every Control Group Structure in each submenu that we’ll need to use, to ensure they become available. This would be everything in the “OverClocking PerformanceProcessor, Memory, and Ring†folders, as well as the “OverClocking Feature†option. This will take a little while.
If you’re a little cocky (like me), you can unhide as many options as you like while your in here. So far I haven’t found anything all that useful, but you never know. Remember, this is at your own risk. You better have some idea what the settings do before you change any of them, after flashing the modified image.
Once you’re done customizing, click the Save button (the floppy disk). Now we’re ready for the scary part. Go back to the command prompt and type “AFUWINx64.exe bios_modified.bin /Dâ€. This will verify your modified image by comparing it against the one currently in place to make sure it’s valid. If the tests pass, you should be good to go. Now all we have to do is flash the image by typing “AFUWINx64.exe bios_modified.binâ€. Once the flash completes successfully, we’re ready to reboot and change some settings.
This part will require some experimentation on your part. If everything went well, you should have the “OverClocking Performance†submenu under the Advanced tab in your BIOS. But what now? Well, a couple things. First, we enter this menu and turn on the “Overclocking Featureâ€. Next, we enter the Processor and Ring menus, set the “Offset Prefix†to negative, and try lowering the “Core Voltage offset†and “Ring Voltage Offset†respectively. These numbers need to be the same. Most machines should be able to undervolt by at least 120mv (0.120). My Razer Blade Pro is stable down to -155, and that’s with the Uncore (cache) voltage set to -40mv as well. You’ll need to do some trial-and-error testing to see what settings are stable on your system. The best way to do this is to adjust to voltage slightly, save the changes, then reboot into Windows and run your favorite stress testing program. Something like Prime95. If it’s stable after 10-15 minutes, reboot and lower it a little more. Once you get a crash, back off and run the program for longer, at least a few hours. If you use a program like XTU to change the voltage within Windows you can avoid the rebooting step, and you’ll just have to set the stable voltage manually in the BIOS once you’re done testing. Also keep an eye on the power consumption and temperatures in XTU or Afterburner to see how you undervolt is benefiting you.
After all is said and done, and you have your maximum stable undervolt locked in, there’s a few other things we can do with the tabs we unlocked. Under “Memory Overclockingâ€, for example, you can set the “DIMM Profile†parameter to custom and adjust the memory speed. My system runs perfectly stable with the “Memory Ratio†setting at 10, which (On my 2016 Blade Pro) runs the memory at 2666mhz rather than 2133, a sizable performance boost.
The only thing left to do now is try some games. If you system was as bad as mine, loading into PUBG with the graphics maxed would almost always, instantly, power down the system. Now, you should be able to game for as long as you’d like with minimal throttling. Additionally, you may notice your fans running at a lower speed, and you may even achieve higher boost clocks on your GPU due to the extra thermal and power headroom. Neat! We’re all done, and your system is better than ever.
Ultimately, what I’ve learned from all this is that the Razer Blade Pro is a critically flawed machine. This workaround doesn’t change that. As an end user, you should never have to modify your BIOS image to get stability from a $4000+ laptop, under any circumstance. But, if you’re like me and picked up one for cheap on the used market, you can turn a former brick into the portable gaming powerhouse it was meant to be (and maybe have some fun and make a few bucks along the way).
Thanks for reading!
No comments have been posted. Login to post.